Saturday, June 15, 2013

under the sea party ♥

I love summer and here are some cute ideas from my  step Aunt European Cutie! /http://europeancutie.blogspot.com/  she helped me with,  for a summer under the sea beach party! ♥


first lets start off with the party food!

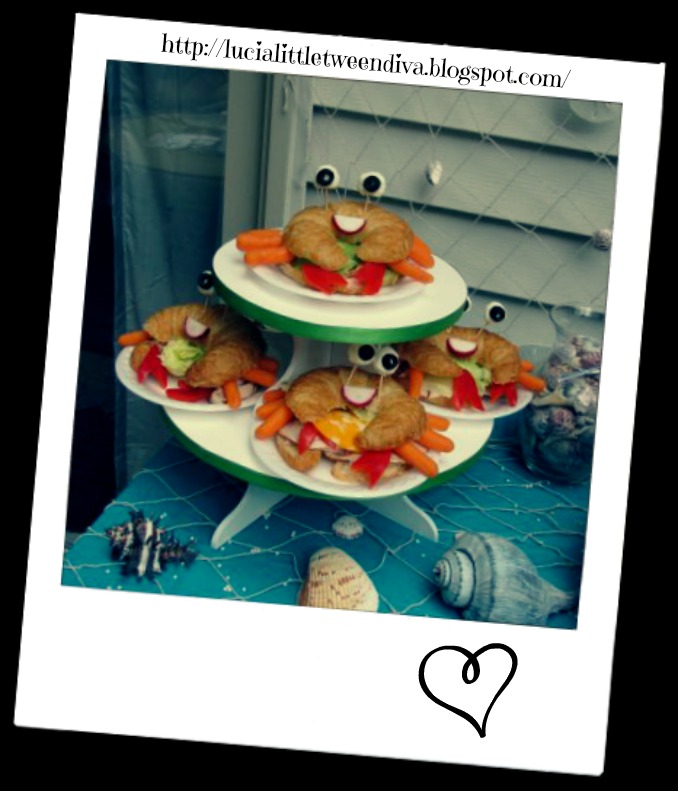
how cute are these crabby sandwiches!
  • 1 croissant
  • Sandwich filling*
  • 6 baby carrots
  • 2 toothpicks
  • 1 black olive
  • 2 cream cheese balls (1/2-inch)
  • 1 red bell pepper
  • 1 radish

  • Helpful Tip:* We used ham and cheese in our sandwiches, but crab, chicken or tuna salad, and PB&J also make delicious fillers.

    How to make it

    1. Slit open the outside edge of a croissant, as shown, and stuff it with sandwich filling.*
    2. Tuck six baby carrots into the sides to form legs.
    3. Slide two 1/2-inch balls of cream cheese onto toothpicks, top each with a black olive slice, and stick them in place as shown.
    4. Snip off the tips of the croissant and slide a red bell pepper claw into each end.
    5. Finish the crab by attaching a radish slice smile with a dab of cream cheese.


    and for snacks you can't forget the goldfish crackers!


    and for drinks we had blue lemonade, the color of the sea!


    it's sugar free berry blue kool aid!

     
    and for dessert so cute! little clam cookies!


    What you'll need

    • Pink frosting
    • Small, round wafer cookies
    • Yogurt-covered raisins or peanuts
    • White frosting
    • Black food coloring

    How to make it

    1. To make each oyster, spread a layer of pink frosting on the bottom of a small, round wafer cookie, then gently press a yogurt-covered raisin or peanut on top. Position another cookie as shown, anchoring one edge in the frosting.
    2. Dab on white frosting eyes, then use a toothpick dipped in black food coloring to add pupils.


    now for the crafty part, cute diy flip flops here's how to make them!


    we got these at Jo Ann fabrics  and picked out everything I would need to create a basket of flip flops! Use a glue gun and add the embellishments super easy and super cute!

    I hope you enjoyed my under the sea party!

    xoxo, Love Lucia ♥
     

    Saturday, May 18, 2013

    lucia's glamping party! ♥

    Hi everyone!  Last night I had a party! I was so excited to have a glamping party! What's glamping ? It's a little diva..camping! :)  here are some great ideas for your next glamping party..


    and why not camp indoors! Here is a supercute idea!

    we did our nails...like little divas do..♥


     for the food we had, ants on a log, (celery sticks with peanut butter and raisins)


    for dinner.. pigs in a blanket, mini hot dogs wrapped in crescent rolls!
     
     
    and dirt cups for dessert..
    plain chocolate Jello pudding (no cool whip or cookie mixed in) and crushed up double stuffed oreos on top. And gummy worms for the topping!


    and for drinks bug juice in supercute mason jars.. its just lemonade..but a cute camping idea!


    and you have to have smores!
                                       why not a diy smores bar ..with pink marshmallows.. supercute!


    we roasted our pink marshmallows indoors by the fireplace...because that's what little diva's do!


    here is a fun craft! personalized pillowcases everyone can make their own, to take home, using fabric paints!


    and now it's time for light's out, after all we are still camping under the stars..right?


    hope you enjoyed my glamping party!


                                                      xo xo         
                                                          ♥                   
                                                      Lucia


    Thursday, May 2, 2013

    lucia's cinco de mayo party ♥


    Hi everyone It's almost cinco de mayo! Since my nationality is  half Puerto Rican, Greek, and Italian, I love celebrating!  come join my party with my friends!
     
     
    let's start off the party with some mini taco dips! supercute!


    Ingredients
    • 2 cans bean dip
    • 2 cartons fresh guacamole
    • 1 packet taco seasoning mix
    • 8 ounces light sour cream
    • 2 cups grated sharp cheddar
    • 1 cup diced tomatoes or pico de gallo, drained
    • 1 cup sliced green onions
    • 2 (3 ounce cans) sliced black olives, drained
    Instructions
    1. First, combine sour cream and taco seasoning mix and blend thoroughly; set aside. Begin layering dip ingredients in the following order: Bean dip, Guacamole, Sour cream mixture, Cheese, Tomatoes, Green onions, Black olives.
    2. Cover with plastic wrap and refrigerate until time to serve. Serve with tortilla chips or Fritos Scoops (my favorite!)
    3. Yields: about 16 individual cups
    now for the dessert... cute sombrero cookies!

    What you'll need

    • 1 sugar cookie
    • white icing
    • nonpareils, colored
    • white gumdrop

    How to make it

    1. To make one, frost the edge of a sugar cookie with white icing and roll it in colored nonpareils.
    2. Next, coat the bottom and the lower edge of a small white gumdrop with frosting. Roll the edge of the gumdrop in the nonpareils, then set the gumdrop in the center of the cookie.

     
    lets make some mini pinatas!

     
    use toilet paper rolls, decorate with cray paper.. and fill with confetti candy! instant mini pinatas!


    and here are some diy fashion fiesta supercute bracelets!


    What you need:
    • T-shirts
    • Bangle bracelets
    • White craft glue
    • Scissors
    • Hot glue gun
    What you do:
    1. First you'll want to cut your t-shirt material into strips. My strips were about 16 inches long and approximately 1 inch wide. The material will stretch as well, making them considerably longer.
    2. To create a simple single colored bangle, first stretch the material out, tie the t-shirt strip in a loose knot around the bracelet.
    3. Wrap the material tightly around the bangle. If you run out of material before you get to the end, simply hot glue another strip to the end of your current strip and continue.
    4. When you arch the end, untie the first knot and tie the two loose ends together. Tie them tight and position the knot on the inside of the bangle, cut the ends and secure with some white craft glue.
    5. To make braided bracelets, gather SIX strips of material, 2 of each color you wish to use. It's best to choose contrasting colors. I used four tie-dyed strips and two white strips for one bracelet, and for the other I used two each gray, tie-dye, and pink.
    6. Use a hot glue gun to attach two matching strips, end to end to make one long strip. Repeat for the others. Stretch out the material, taking care not to pull them apart where they are glued. Tie the three strips together in a loop knot, leaving a couple of inches above the knot.
    7. Braid the strips together. When you get to the end, wrap in a rubber band or tie with some scrap fabric (only temporary). Wrap the braid tightly around the bangle. When you reach the end, loosen the knots on both ends and tie together. Secure the knot with white craft glue. Trim the fringed ends to a length that you like.

                                                             This is my beautiful friend Ava!

     
    I hope you enjoyed my cinco de mayo party!


                                                  Love, ♥
     
                                                         Lucia!


    Saturday, April 27, 2013

    watermelon nails and diy fruit pops ♥

    Hi everyone here is my first post hope you like it!  A diy for watermelon nails.. so cute! and a recipe for yummy watermelon pops! ♥

    watermelon nails....

    Supplies:
    • Coral, bright pink or red nail polish
    • Green nail polish
    • French manicure nail stickers
    • Black acrylic paint
    • Toothpick
    • Clear nail polish


    1. Paint pink/red base coat. Allow to dry.
     
    2. Tape off the tips with the french manicure stickers.
     
    3. Paint tips green.
     
    4. Remove tape strips. Either take them off when the paint is really fresh or after it has dried for a long time, otherwise it will make the edges furry.

    5. Use a toothpick to add a black dot in the middle of your nail. Use the opposite tip to drag the dot to a point making a teardrop shape. Repeat putting three "seeds" on each toenail. I did not do seeds on my pinky toenails because they are tiny.

    6. Cover with a clear coat to add shine and protection.

    so cute!

    now for the watermelon pops recipe..


    ask an adult to help ..trust me!

    Ingredients
    • 1 cup sugar, divided in thirds
    • 1 pkg. (3 oz.) Jell-O Lime Flavor Gelatin
    • 2 cups boiling water, divided
    • Ice cubes
    • 1 cup cold water, divided in half
    • 1 pkg. (3 oz.) Jell-O Strawberry Flavor Gelatin
    • 3 tablespoons miniature semi-sweet chocolate chips
    • 1/2 pkg. (4 oz.) Cream Cheese, softened
    • 1-1/2 cups COOL WHIP Whipped Topping, thawed
    Instructions
    1. In a medium bowl, combine 1/3 cup sugar and lime gelatin.
    2. Add 1 cup boiling water, stir until dissolved, about 2 minutes
    3. In a measuring cup, add 1/2 cup cold water and enough ice cubes to measure 3/4 cup
    4. Add to lime gelatin, and stir. Remove any remaining ice cube pieces.
    5. Refrigerate for 25 minutes
    6. In a medium bowl, combine 1/3 cup sugar and strawberry gelatin.
    7. Add 1 cup boiling water, stir until dissolved, about 2 minutes
    8. In a measuring cup, add 1/2 cup cold water and enough ice cubes to measure 3/4 cup
    9. Add to strawberry gelatin, and stir. Remove any remaining ice cube pieces.
    10. Divide strawberry gelatin into a paper cup {3 or 5 oz} and freeze for 20 minutes
    11. Stir in 1/2 teaspoon chocolate chips into each cup
    12. In a medium bowl, beat the softened cream cheese and remaining 1/3 cup sugar until smooth, fold in Cool Whip
    13. Spread over strawberry mixture
    14. Add a layer of lime gelatin
    15. Cover cup with plastic wrap and insert a wooden popsicle stick into the center
    16. Freeze until firm, about 3-4 hours

     
    have a great weekend! thanks for looking!


    Love, Lucia ♥